Feeds:
Posts
Comments

Posts Tagged ‘beauty secrets’

Hello all,

As you all know I’m quite the make-up junkie and love experimenting with new make up and skincare all the time.

I was recently introduced to the Burberry’s contour & highlight pen and the simplicity of using it to sculpt your face without looking too drag like. It’s special cream to powder formula makes it real easy to draw on the face and spread it with your fingertips. Pretty much idiot-proof.

So I got the Face Contour pen in Medium No.1 & Fresh Glow pen in Nude Radiance No.1.

I must say after trying it out, it helps with the shading which is not overly dramatic and adds some oomph to the face shape. It doesn’t add much time to my make-up regime (usually 30min for daily make-up)

Here’s a video clip on how I used it.
And this is the look that was achieved (without any phot editing of course) after I used it:

For those of you who are newbies to shading and highlighting your face, I do highly recommend this as the formula is lightweight, easy to use and pretty much foolproof.

XOXO

Jessica T.

Read Full Post »

Hello Everyone!

A very Happy 2016 to all!

To be honest, I’m not a fan of painful facials where the technician man(more like woman) handles my face and forcefully squeezes out all my black/whiteheads, scrubs my skin and then masks it – that I can DIY myself at home and be more gentle to my delicate facial skin.

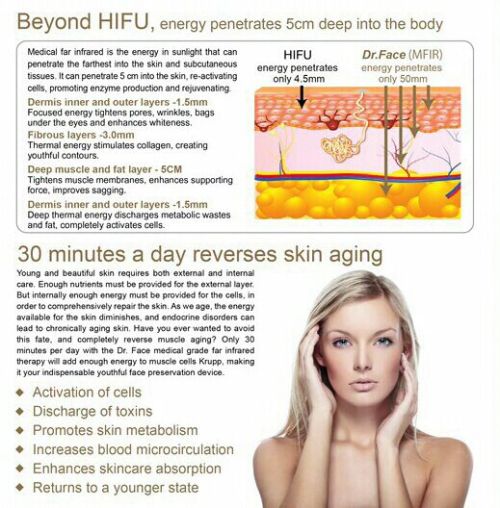
However, I was recommended to try the Dr. Face facial out as it uses an infrared device and all you need to do is to lie inside this “helmet-like” machine for about 30 minutes with a facial mask on and it will work miracles on your face. This latest technology is from Korea & is a USFDA approved technology using far infrared light to deeply penetrate into our skin to rejuvenate the cells.

IMG_7216IMG_7215

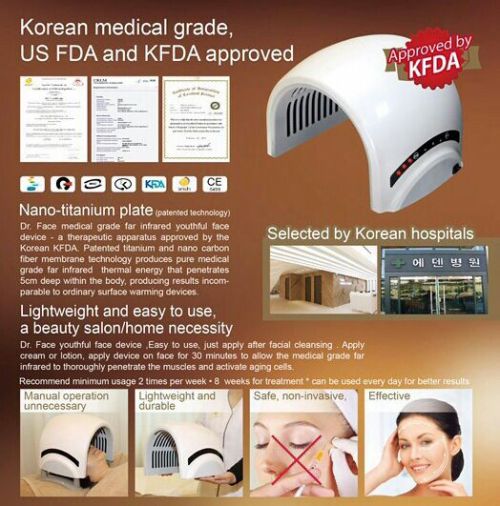
I’ve attached the detailed explanation of how this device works above. But what better way to gain knowledge about Dr. Face is to experience it myself.

So here I am at beauty salon, giving it s a shot!

FullSizeRender 4

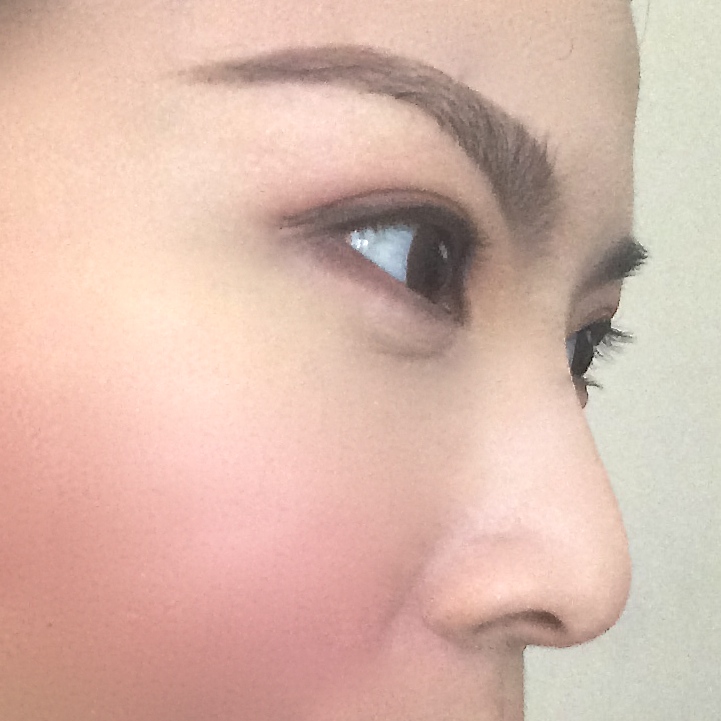
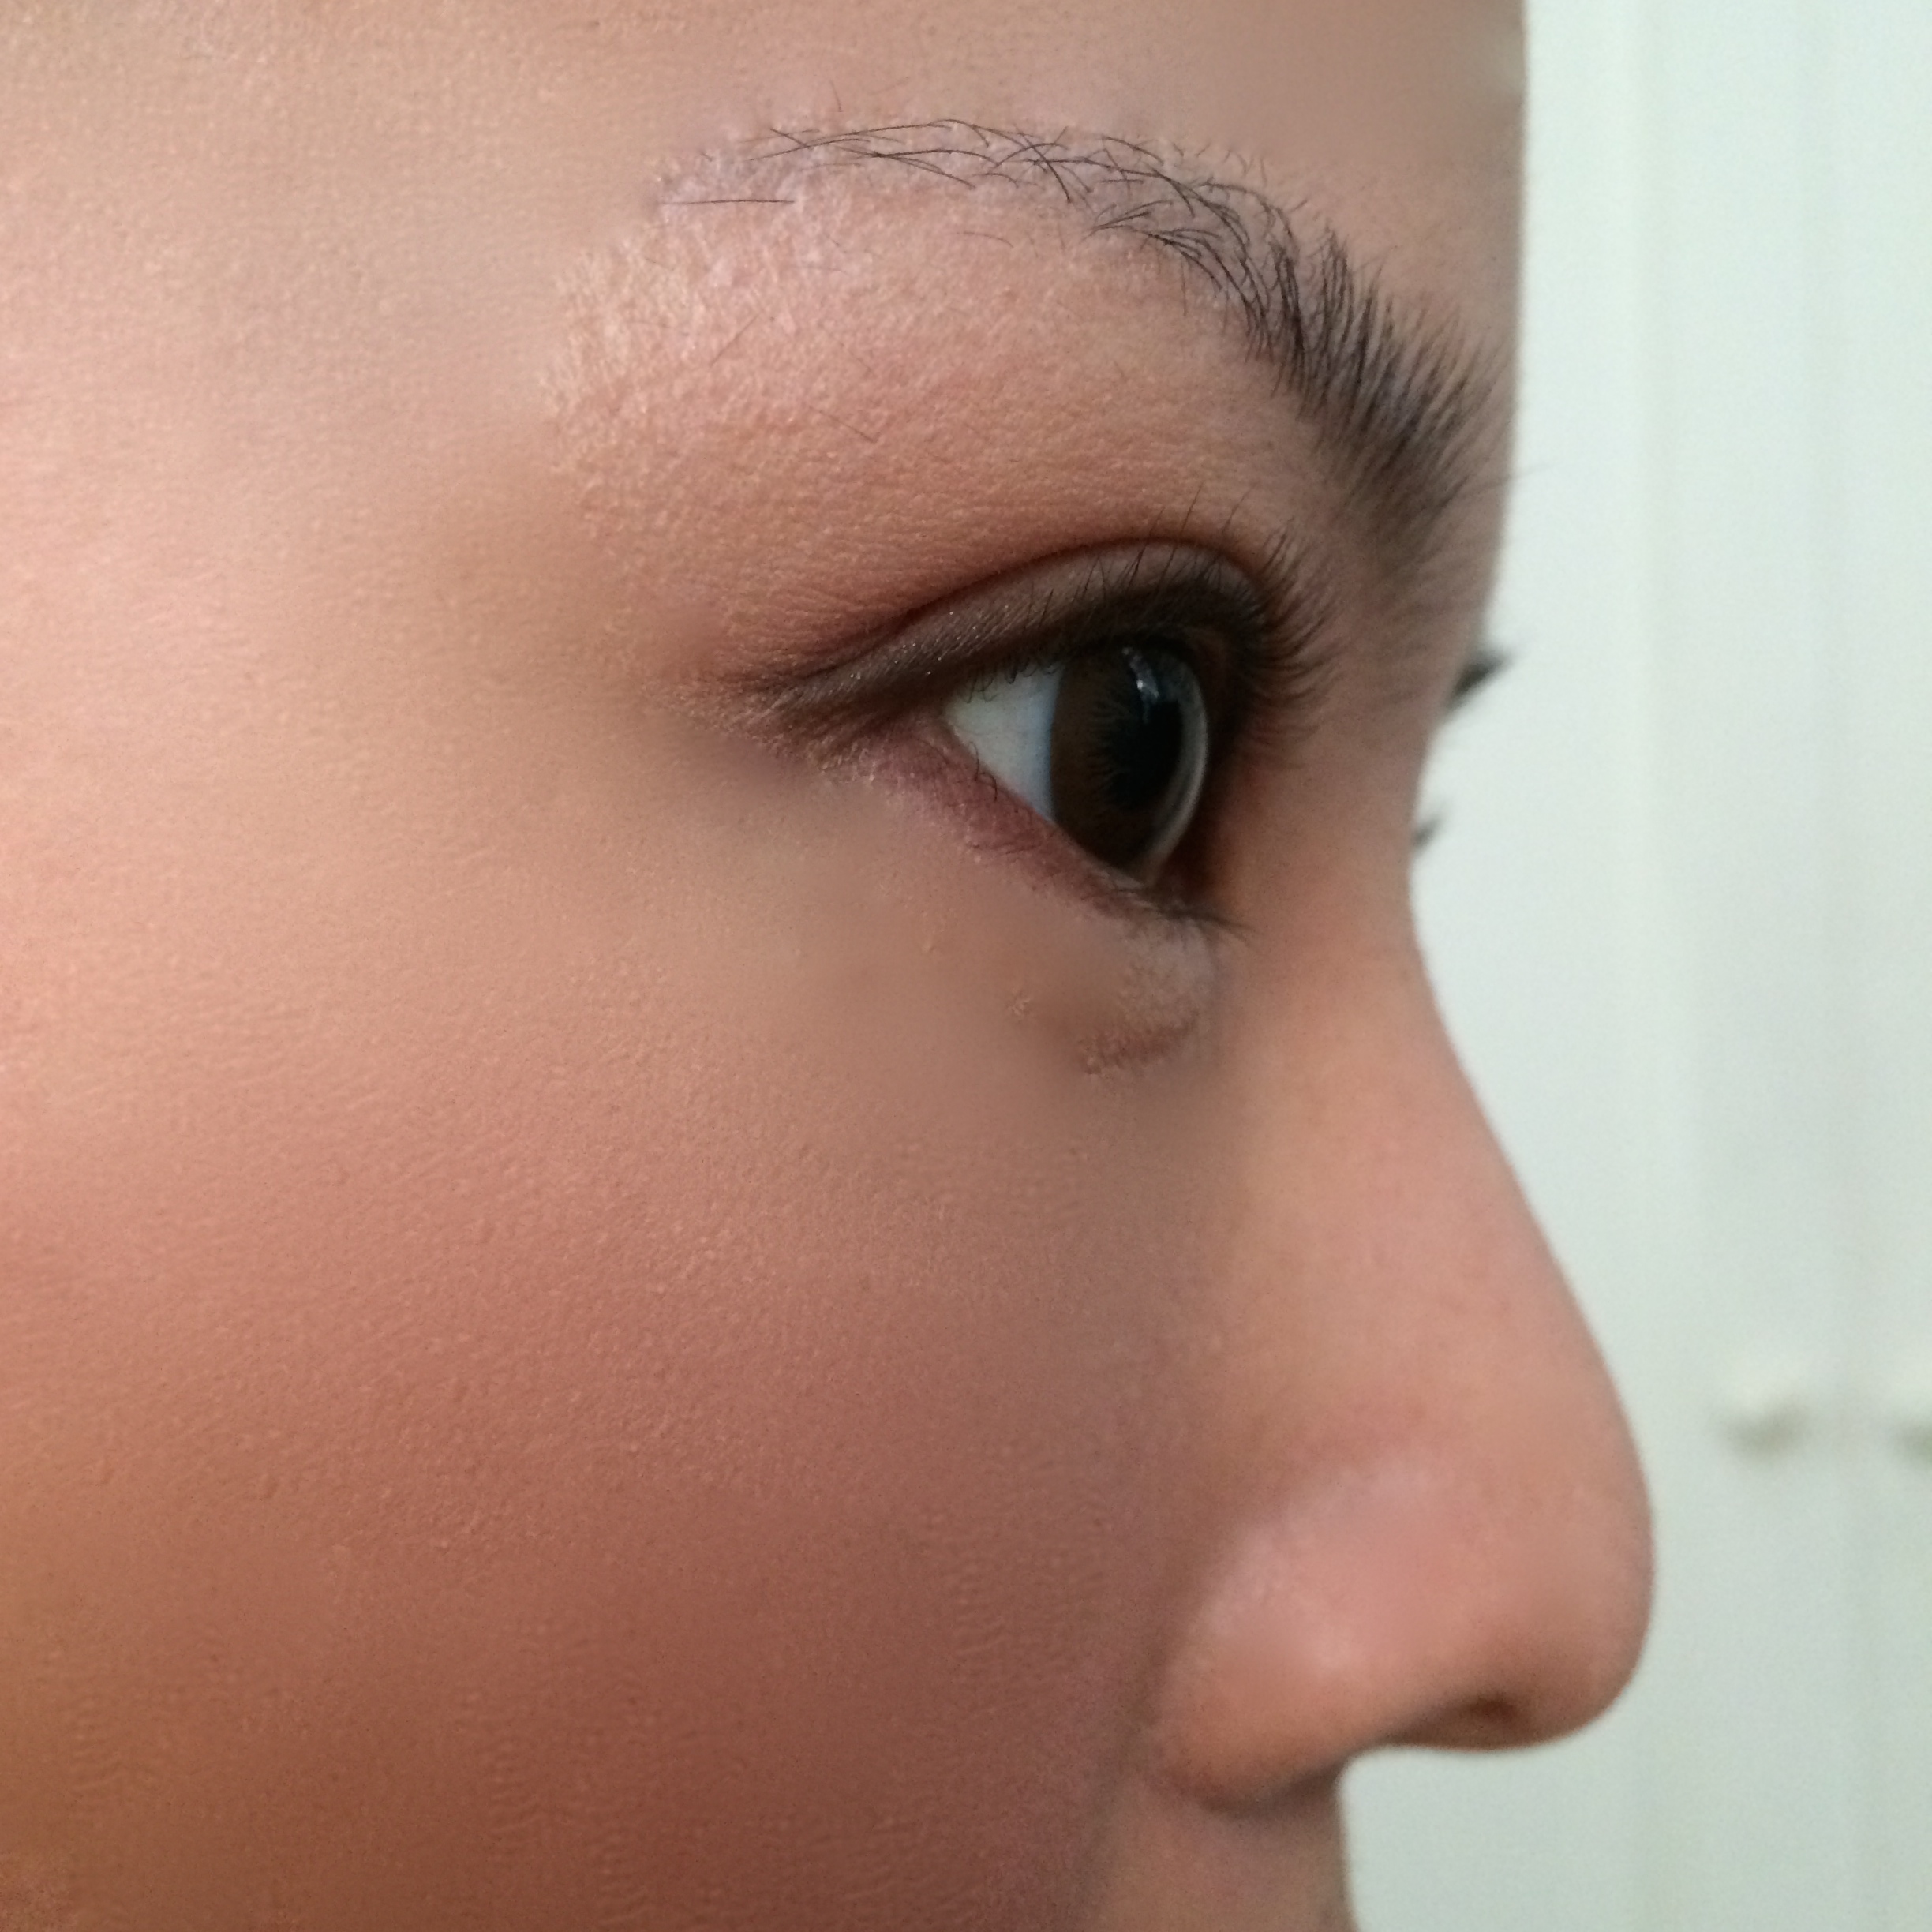
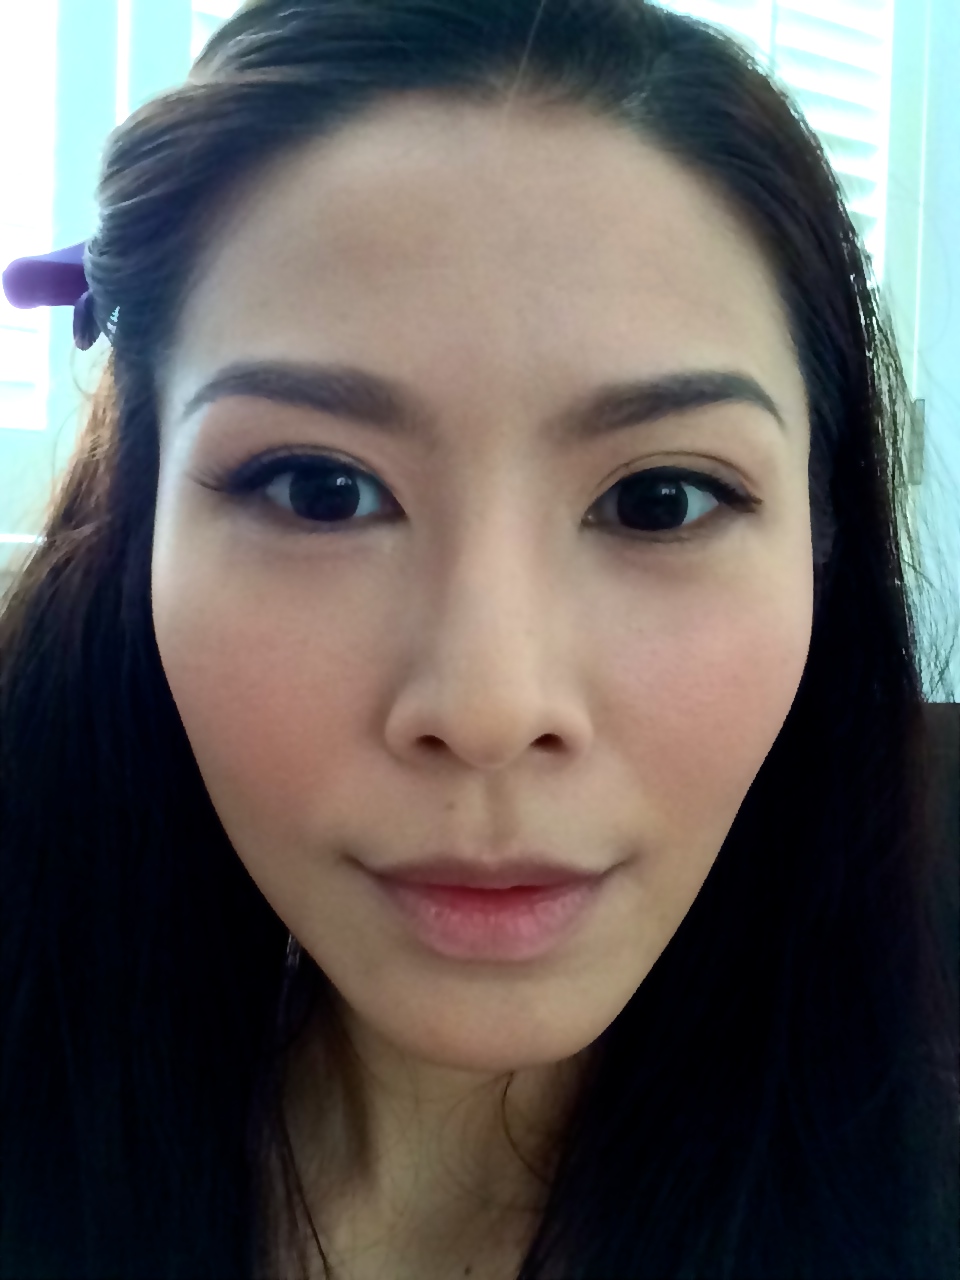
A pre-facial selfie to capture my skin condition before the facial.

I’ve been pretty busy with planning my own wedding since November 2015 and have not been very religious in my home facial routines. As you can tell my skin is starting to look a little dull, and dark eye rings are showing from the long hours of staring into my laptop searching for wedding ideas, dresses, decorations, hotels, venues etc. It’s a fun process but it will also take its toll on my skin conditions and increase stress levels.

First step of the facial process, like all facials, is to get your skin cleansed of all skincare products like sunblock & make-up and dirt on the face.

FullSizeRender 5

Fran, who’s working on my face, gave me a nice facial massage while cleansing which I totally enjoyed. After which, she started the black/whiteheads extraction process which honestly was not pain-free. (I would skip this step if you don’t enjoy extractions)

After which she applied a Korean medical clinic brand facial cream which helps soothe the skin, prevent redness and moisturise. On top of that she added on an anti-aging facial mask which will brighten and smoothen the skin.

FullSizeRender 2

Every inch of my face was covered with this facial mask serum including the delicate eye area. (facial is full face, I know of some places charging “extra” for the eye area serum)

FullSizeRender 8

Now my face is prepped to enter into the Dr. Face infrared chamber. I will lie inside for 30 minutes with the facial mask on, remove the mask, and another 15 minutes to allow the remaining serum to absorb deeply into the dermis.

After a nice 45 minute afternoon nap, the facial is done. The entire process took about 1.5 hours from start to finish. This far infrared rays are meant to work on tightening the pores, firm sagging skin, whiten, smooth out wrinkles and detox the face.

IMG_7214

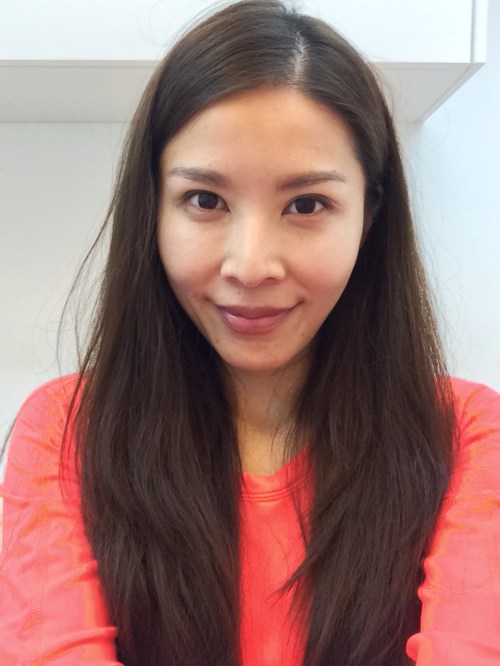
The most immediate effect that I noticed on myself was brighter skin tone, and a lifting effect.

IMG_7211

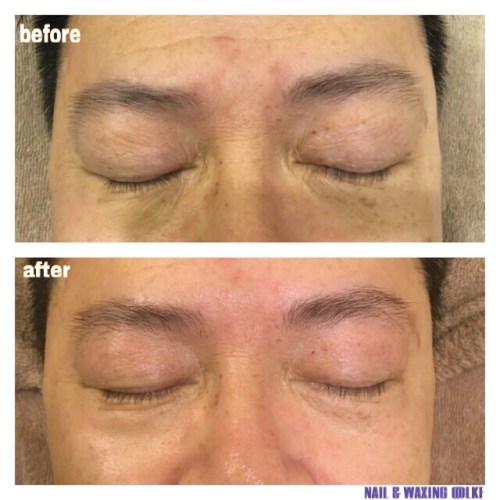
I guess it’s a lot more obvious on older skin. So here’s another example of Fran’s older client who tried Dr. Face. In the photo, you can see the drastic lifting and firming effect on her face. Her eye bags were obviously firmed up and skin tone more even. Even her deep wrinkles smoothened out.

IMG_7212

Conclusion:

Dr. Face is an effective anti-aging facial. And I believe if I constantly do this treatment religiously, my skin will look younger and more radiant after. The true effects of this facial actually showed after 2 days as the collagen levels were boosted up and new cells regenerated. Infrared technology for facial is not new in the market. But this far infrared deep penetrating rays is new for me and much more effective.

Who Offers this Facial?

This facial is currently available at a promotional trial price of HKD$880 (RRP HKD$1500/session) in Hong Kong at:

Nail & Waxing at LKF

Address: No.1 Lan Kwai Fong, Central, Hong Kong

Tel: +852 2530 2022

www.nailatlkf.hk

XOXO

Jessica

Read Full Post »

IMG_9310

Helloooooo….

As promised from my review about the 2-Step Synergy Effect mask, I will review the V Fill-Up Mask once I’ve tried it.

This is another facial mask developed by REGEN Cosmetics which has a face slimming, lifting and anti-wrinkle effect. Similar to the 2-Step Synergy Effect Mask, this masks treats and improves your skin and also helps create a slim V-Line (def: A slim and oval face narrowing towards the chin) face.

IMG_9275

The main difference of the V Fill-Up Mask from the 2-Step mask is that the V Fill-Up mask focuses more on a 3D volume lifting effect by filling up wrinkles and improving the elasticity of the skin. The key ingredients in this mask are:

  1. DPHP which helps with the contractile actions of collagen fibres and protects the ellastine
  2. Adenosine components in the essence help improve facial lines and wrinkles 
  3. Hyaluronic Acid absorbed in the skin provides skin with abundant moisture, giving skin a bouncy firm looking facial appearance.

Application of this mask is slightly different as it comes in 1 full piece instead of 2 separate pieces like the 2-step one.

Here’s how to put it on:

Step 1

Apply mask on clean dry face after toner, leaving the chin part to the last

IMG_9277

Step 2

Separate the facial mask at the chin area and hook the openings on each ear, wrapping your chin and jawline tightly.

IMG_9279

IMG_9280

IMG_9302

Step 3

Leave mask on for 20 minutes. Remove and massage remaining essence into your skin.

IMG_9287


Review:

I noticed the anti-wrinkle and lifting effect instantly, and the very next morning I woke up to plump, smoother, radiant skin which made me very happy! As for the V-shaping effect I find that the 2-Step Synergy Effect mask more effective as that mask wraps around the jawline tighter and applies a firm pressure to that area reducing water retention. Of all the anti-wrinkle masks that I’ve tried so far, this one actually does give a visible result that lasts till the next day. Love it!

Where to Buy:

hermo.sg has it on SALE now at SGD$52.70 (RRP SGD$76.10) per box of 5 sheets.

sasa.com has it on SALE at RMB158 (RRP RMB348)

regencos.com sells at at KRW35,000

XOXO

Jessica

Read Full Post »

IMG_9314

Hello peeps!

I’ve another product to introduce to you from REGEN Cosmetics – 360º S-Line Body Patch. If you are new to the brand REGEN Cosmetics, do read more about this Korean brand in my review of their star product 2-Step Synergy Effect Mask.

So what exactly is “S-Line”? Well… S-Line is frequently mentioned by Kpop stars and on Korean television –  the Korean way of describing a perfect female form or hour-glass figure. Here’s a list of Korean english terms commonly used to describe physical features: (information from http://www.asianplasticsurgeryguide.com)

S-Line – Ample breasts and buttocks when viewed from the side

S-Line (second use) – Side view: forehead to bridge of nose to tip of nose

V-Line – A slim and oval face narrowing towards the chin (see wide face simulation slidshow above)

V-Line (second use) – The line in-between the breasts

W-Line – Breasts viewed from the front

X-Line – Long legs and arms connected by a narrow waist

U-Line – Exposed lower back in low cut clothing

M-Line – A “six pack” of abdominal muscles on men

D-Line – A pregnant (or pregnant-appearing) abdomen

B-Line – Big breasts, big abdomen

O-Line – Generalized obesity

A small waistline, ample bust-line & a firm derrière is often coveted by most women, which is why REGEN developed this body patch to assist in achieving this goal faster on top of a proper diet & exercise.

IMG_9250

The S-Line Body Patch is a Hydro-gel patch suitable for use even during summer months. It contains Halophyte which is a kind of salicornia extract, to reduce cellulite in your body and firms body tone, Adiposlim an ingredient that is 4 times stronger than caffeine for fat reduction and Cafesilane C to provide moisture while reducing fat in the body. This patch is an intensive treatment designed for use in the tummy, arms and thigh areas (areas we are all concerned about and find it so hard to trim down).

IMG_9266

Application of Patch

  1. Clean and wipe skin dry
  2. Remove transparent film from patch
  3. Paste patch on areas of concern – tummy, thighs and/or arms
  4. Leave the patch on for 3-4 hours to allow the active ingredients to absorb into your skin

I applied the patch on all recommended areas. Even though the box suggests to apply 1 patch on each arm/thigh. I found the patch big enough (measures 14cm x 10cm) to cut it into half instead and use 1 patch for both arms/thighs.

Arms:

IMG_9272

Tummy:

IMG_9261

Thighs:

IMG_9257

Review:

The patch stays on respected areas nicely and does not feel uncomfortable at all. When I applied it, I felt a cold tingly feeling on those areas where the patch is on, signalling that the active ingredients are slowly being absorbed into my body. For effectiveness, I know results won’t be seen overnight, but immediately, I could feel myself getting hungry faster which also means my metabolism rose, increasing the fat burning effect if you exercise after application. I would recommend the use of this patch at night when you go to bed to leave it on without worrying about the patch falling off or wearing clothes to cover it up when heading out as it requires hours of application. And… who doesn’t mind assistance in slimming down stubborn areas while sleeping anyway?

Where to buy:

hermo.sg is having a promotional offer now selling a box of 5 pcs at SGD$52.70 (RRP SGD$76.10)

regencos.com sells it at KRW35,000

These 2 places are the official distributors of REGEN Cosmetics original products. So, I do recommend purchasing from these places to ensure effectiveness and quality.

XOXO

Jesscia


Read Full Post »

Today, I am going to share with all you girls this simple yet really effective way to curl your eyelashes with tools that you definitely have at home – a hairdryer & your eyelash curler.

Firstly, choose a good eyelash curler suitable to the shape of your eye socket. To me, Asian eyes tend to be less deep set and flatter in the curvature, so brands like Shu Uemura & Shiseido are likely to be more suitable to our eyes. My personal favourite is Shu Uemura. Invest in a good eyelash curler and it will last you for many years!

I have typically Asian eyelashes, short & straight, but I found a way to keep my lashes curled all day with heavy layers of mascara. Usually, with many layers of mascara, my lashes tend to droop pretty quickly and loose the curled effect.

This is how I do it:

1. Heat up the eyelash curler with your hairdryer at low speed for 5-10 seconds till the curler is heated up but not too hot on your eyelids.

IMG_3813

2. Curl your lashes as per normal. Gently clamp down on your lashes closest to your eyelids, release, and clamp down again in an upward motion towards the tip of your eyelashes almost perpendicular to your eye. It is about 10 gentle clamps with the curler.

IMG_3808

TIP: Make sure you do not heat your eyelash curler for more than 10 seconds or you may overheat the metal and burn your eyelids.

3. Repeat Step 1 and Step 2. I usually will do this 3 times on each eye.

IMG_3801

My lashes before curling – straight as hell

IMG_3776

My lashes after using a heated eyelash curler

IMG_3779

I love how easy my eyelashes curls, opening up my eyes instantly

4. Once you have achieved the curled effect you want, apply 2-3 coats of mascara.

IMG_3784

A false lash effect achieved!

I find this method much more effective than just using an eyelash curler on its own, or even an expensive heated eyelash curler. Especially for my type of short and straight eyelashes. The compression and heat from using a hairdryer with your eyelash curler will create a temporary permed effect to last you throughout the day. It’s the same concept as using a heated tong for your hair to create curls – this is the miniature version!

Try it to believe it!

XOXO

Jessica

Read Full Post »

IMG_3371

(Curls using Miracurl, jewellery from Mint Bauble)

Applying foundation on your face is one of the most basic forms of make-up, but it isn’t the easiest to do it well. Firstly, you have to find the perfect match of colour to your skin tone, then a foundation brand that doesn’t just sit on your skin but blends in like it’s part of your skin. To me, the perfect Summer time foundations that work great are RMK’s liquid foundation & Kate’s Powderless Liquid for Cover.


IMG_3342

Both these foundations keep your skin pretty much shine-free throughout the hot and humid days and they don’t cake up from the heat! If you are wondering why my foundations are in different shades – the RMK one darker(one or two shades darker than my skin tone) & Kate a lighter shade(matches my actual skin tone). I use 2 different shades to “sculpt” my face and give it a slimming effect. Great for days when you feel that your face is retaining water from a late night of partying, or its that time of the month…

Start with the darker shade first. In my case, I am using RMK liquid foundation. Apply it under your cheekbone area till your jawline.

IMG_3340

Blend it downwards towards your neck using your fingers or a foundation sponge. (I simply use my fingers)

After that, apply the lighter shade on the peaks of your cheekbone.

IMG_3345

Blend in the lighter shade downwards towards the darker shade. Make sure both the foundations blend in well, without being able to see a distinctive change in colours.

After your base foundation is done, use a highlighter pen (I am using YSL’s Touché Éclat) on your nose bridge, under eye area & smile lines. Focus on your nose bridge – this will make your nose seem sharper & higher. (I often get asked if my nose is fake, or who is the surgeon that did my nose! I take that as a compliment but it’s just good make-up tricks peeps!)

IMG_2347

(picture from previous post on Touché Éclat)

Blend in the highlights & apply a layer of translucent loose powder on your face. Get a brown-shade blush ready to create a more shapely face. Here I am using MAC’s Wonderwoman blush which carries 3 tones – pink blush, brown shading blush & a highlight blush.

IMG_3351

Use an eyeshadow brush to pick up some of the brown blush, apply it on the sides of your nose bridge.

IMG_3352

IMG_3353

This creates a sharper & slimmer nose.

TIP: Use the highlight blush on your under eye and cheekbone area for a radiant glow!

Now that your perfect base is done. (which is oh-so important!) You can just stop right here and add a touch of blush, brows & mascara & you are good to go! But I am going to carry on to show you my favourite falsies to use to brighten up your eyes and NOT have that “umbrellas shading your eyes” look. If you know what I mean… 😉

IMG_3358

These are the 3/4 length falsies which wing-out to longer lashes at the ends. Easily found in any SASA or Watson’s stores. MAC & Shu Uemura have them too but they are a lot more costly.

So, curl your lashes, apply a layer of mascara, then glue on these falsies from about 1/3 distance away from your tear-duct.

IMG_3359

See how they immediately open up my eyes with the winged effect of the lashes. And they are much easier to use too!

IMG_3360

Do the same for the other eye. Apply a tad of lip gloss/balm and we are done!

Ready for a slimmer more sculpted face? Try out these little tricks of mine which I use daily when I head out for castings!

XOXO

Jessica


Read Full Post »